
Fortress Merge Getting Started Guide
Learn the board, the shop, and the first ten waves before you chase tiers.
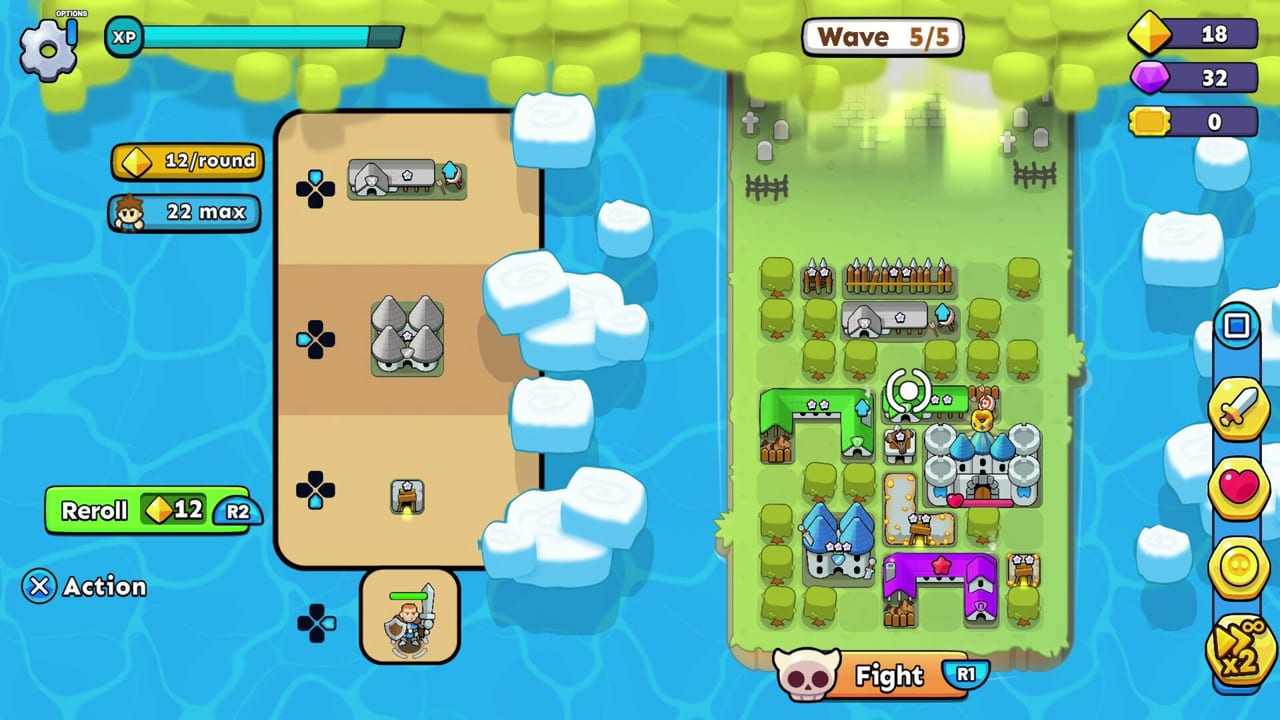
Fortress Merge is easy to launch and easy to brick. You drag three buildings out of a shop, hit Fight, and watch cartoon knights collide with slimes. Ten minutes later the castle is gone because the lane had no walls, the mines sat on the entrance, and you merged every barracks into one slow camp. This page is the first-hour fix. Pair it with when to merge and placement once you can finish a normal map.
The goal of a level
Enemies spawn at the top of the lane and walk toward your castle. If the castle’s HP bar hits zero, the level resets to wave 1. Everything else can burn and will respawn for the next shop phase. That rule is the whole game: the castle is sacred, walls are cheap insurance, and a dead Tesla is only a dead Tesla until the wave ends.
Most campaign maps run 10 waves with a boss on wave 10. Milestone maps (the ones that end in 0 or 5 later in the list) stretch to 13 waves with an extra boss around wave 8. The HUD prints Wave 8/10 or Wave 8/13 so you always know which clock you are on. Speed-up sits on the right; use it after you trust the layout, not while you are still learning hitboxes.
Shop, tiles, and trees
Each prep phase offers three buildings. Drag one onto an empty tile to place it. Drag it onto a matching building of the same tier to merge. Drag it off the board (or onto a sell zone) to cash it. The left panel also shows your current gold-per-round and unit cap once camps are down.
Trees occupy tiles until you pay to clear them. Round 1 gold should almost always buy space, not a luxury reroll. A cramped board cannot accept the wall you need on wave 4. Leave at least two empty squares so the next shop can land without an emergency sell.
The castle itself can be moved. It cannot be merged or sold. If it sits on the lane, drag it to the back row immediately. That single move saves more runs than any hero skill.
What to place first
- Barricade / wall on the entrance so slimes chew wood instead of your mage tower.
- A unit camp — barracks, ranch, or archer — so something walks out to meet the wave.
- A turret or Tesla behind the wall, inside the stall.
- A mine only if it sits behind the wall. A mine on the front tile is a donation to the enemy.
- Hero on a tile that is not the lane choke. Heroes fight; they are not walls.
If the shop denies you a wall, use a cheap camp as a temporary body and reroll once if gold is still near zero. Reroll costs climb. The gold guide covers when to stop rolling.
Fight button and after-wave shop
When the board is good enough, press Fight (R1 on a controller, the skull button on the HUD). Watch the first seconds: if enemies walk around your wall, you placed it wrong. Pause, remember the path, and fix it next prep. Do not spam speed-up until the path is honest.
After the wave, destroyed buildings return. Spend the new gold on a missing role, not a third copy of whatever you already have. Merge walls. Think twice before merging camps — extra spawners beat one fat barracks on a wide lane. Details are in the merge guide.
Skills, XP, and the draft
Merging grants XP. When the bar fills, a skill draft appears: three cards with rarities such as Rare and Epic. Typical early cards add attack radius, horseman damage, or “next blockers unlock for free.” Prefer global bonuses — cooldown, building HP, all-turret damage — over a 10% buff to a unit you do not field. You can reroll the draft with gems; save that click for a boss wave. The boss guide lists the picks that actually matter on wave 10.
Heroes without the gacha panic
You will place one hero. Steam and consoles advertise three unique heroes, each with a combat skill and a permanent boost. Mobile unlocks more faces as you climb (Jeanne is a common mid-campaign swap). Do not dump every blueprint the first night. Read heroes and gear before you fuse a set you cannot undo.
First-session checklist
- Move the castle off the lane.
- Clear two trees if they block the front.
- Place a wall, a camp, and a turret.
- Claim shop dailies from free rewards after the run.
- Retry a failed map instead of rage-rerolling gems.
When that checklist feels automatic, open the building tier list and start refusing dead shops on purpose.
Frequently Asked Questions
Quick answers to the most common questions.
What happens if a building dies during the wave?
It returns for the next prep phase. Only the castle is a true game-over if it reaches zero HP.
Should I merge on wave 1?
Merge walls if you have a pair. Leave extra unit camps unmerged until the board is tight.
How long is a normal level?
Ten waves for most maps, thirteen on milestone stages, plus shop time between waves.